
If you’ve been searching for the perfect pepper belly pete mac and cheese recipe, this version brings everything together in the most satisfying way. Loaded with the bold flavors people love from the original pepper belly pete mac and cheese, this copycat pepper belly pete mac and cheese recipe keeps all the creamy richness and peppery heat that make it unforgettable. From the first bite, the blend of cheeses, spices, and smooth sauce sets the stage for a comfort dish that stands out from the rest.
What makes this pepper belly mac and cheese recipe so special is its balance of indulgence and spice. Cream cheese, evaporated milk, and layers of melting cheeses create a silky, ultra-creamy base, while Creole seasoning and fresh black pepper add warmth without overpowering the dish. The result is a mac and cheese that’s flavorful, satisfying, and complex in the best way-rich enough for guests, comforting enough for weeknights.
Whether you’re preparing a holiday spread, hosting a family dinner, or simply craving a nostalgic favorite, this pepper belly pete mac and cheese is guaranteed to become a repeat request. Its crowd-pleasing flavor and irresistible texture make it the perfect dish to keep in your recipe rotation, proving that classic comfort food can still deliver big, memorable flavor.
What is Pepper Belly Pete Mac and Cheese and How Does It Taste?
Pepper belly mac and cheese is a southern-style baked macaroni and cheese known for its ultra-creamy texture and distinctive peppery, slightly spicy flavor profile.

Unlike traditional mac and cheese recipes that rely solely on a roux-based cheese sauce, this version incorporates cream cheese and evaporated milk to create an exceptionally rich and velvety base that coats every piece of pasta. The taste is luxuriously creamy with sharp cheddar notes, balanced by the warm spice of Creole seasoning, dry mustard, and generous amounts of fresh cracked black pepper throughout.
The top layer bakes to golden, crispy perfection while the interior stays incredibly moist and cheesy. It’s the kind of comforting, soul-satisfying dish that makes you understand why mac and cheese is considered the ultimate comfort food.
Pepper Belly Pete Mac and Cheese Recipe Ingredients
Ingredients
Pasta:
- 1 lb (454g) elbow macaroni or small pasta of choice
- 2 generous pinches of kosher salt for pasta water
Cheese Sauce Base:
- 2 blocks (8 oz each) cream cheese, room temperature (total 16 oz / 452g)
- 1 can (12 oz / 354ml) evaporated milk
- 2 cups (480ml) whole milk
- 2 large eggs, lightly beaten
- 4 cups shredded cheese, divided (sharp cheddar and mild cheese blend recommended)
Seasoning:
- 1½ tsp kosher salt (or to taste)
- 1 tsp dry mustard powder
- ½ tsp ground nutmeg (optional)
- 2–3 tsp Creole or Cajun seasoning (Tony’s, Slap Ya Mama, or Creole Kick)
- Fresh cracked black pepper (generous amounts)
For the Pan:
- 2–3 Tbsp butter for greasing
Kitchen Utensils
- Large pot for boiling pasta
- 13×9-inch baking dish
- Large mixing bowl
- Whisk or hand mixer
- Colander for draining pasta
- Measuring cups and spoons
- Pepper grinder
- Small bowl for beating eggs
Preparation and Cooking Time
Prep Time: 20 minutes
Cook Time: 55-60 minutes (10 minutes pasta + 45-48 minutes baking)
Resting Time: 10-15 minutes
Total Time: 1 hour 30 minutes
Servings: 10-12 servings
Copycat Pepper Belly Pete Mac and Cheese Recipe
Step 1: Preheat and Prepare
Preheat your oven to 350°F (175°C). Start this about halfway through your prep work so it’s ready when you assemble the dish.
Step 2: Boil the Pasta
Bring a large pot of heavily salted water to a rolling boil. Add 1 lb elbow macaroni and cook to al dente according to package directions (typically 9–10 minutes). Drain immediately and rinse with cold water to stop the cooking process. Set aside.
Step 3: Make the Creamy Base
In a large mixing bowl, add both blocks of room-temperature cream cheese. Pour in the 12 oz can of evaporated milk. Whisk vigorously or use a hand mixer until mostly smooth with no large lumps remaining. Add 2 cups of whole milk and whisk again until fully combined and silky.

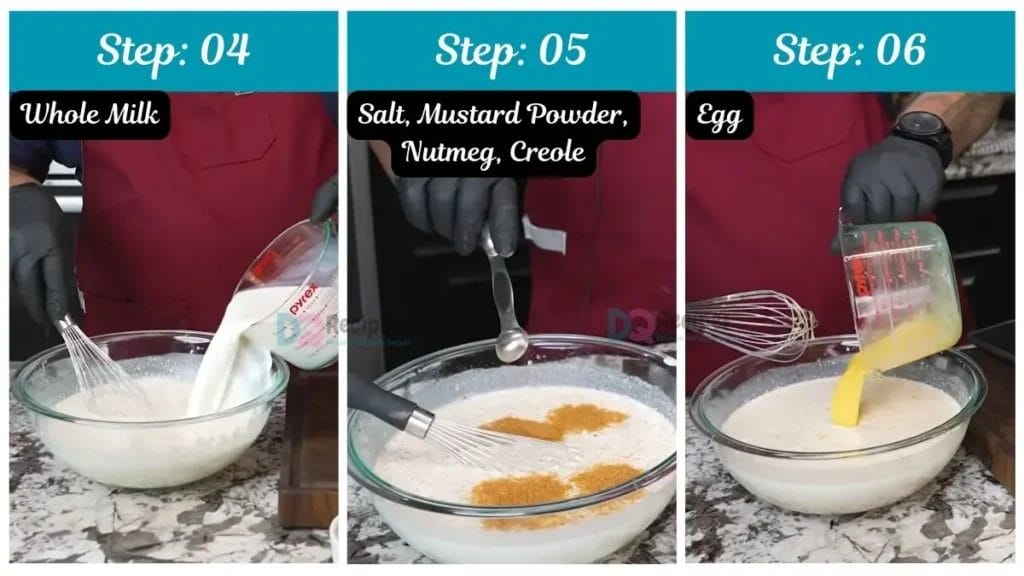
Step 4: Season the Sauce
Add kosher salt, dry mustard powder, nutmeg (if using), and 2–3 tsp of Creole seasoning to the cream mixture. Taste the mixture at this point (before adding the egg) and adjust seasoning as needed. Add several generous grinds of fresh black pepper.
Step 5: Incorporate the Eggs
Lightly beat the 2 eggs in a small bowl, then whisk them into the cream mixture until fully incorporated. This adds richness and helps the sauce set properly during baking.
Step 6: Add Cheese to the Sauce
Stir in half of the shredded cheese (2 cups) until mostly melted into the sauce, creating a thick, cheesy base.
Step 7: Grease the Pan
Take your 13×9-inch baking dish and generously rub the bottom and sides with butter. This old-school technique creates flavor and prevents sticking.
Step 8: Layer the Mac and Cheese
This layering technique is key to the perfect pepper belly pete mac and cheese:
- Pour a thin layer of cream sauce in the bottom of the dish
- Sprinkle a handful of shredded cheese over it
- Add half the cooked, drained pasta
- Grind fresh black pepper over the pasta layer
- Pour half of the remaining cream sauce over the pasta
- Add the rest of the pasta
- Pour the remaining sauce over the top, gently pushing pasta down so it’s mostly covered
- Sprinkle a light layer of shredded cheese on top (reserve some for the final topping)
- Add a few more cracks of black pepper
Step 9: First Bake
Bake uncovered at 350°F for 30 minutes. The mac and cheese will be bubbly and starting to brown around the edges.
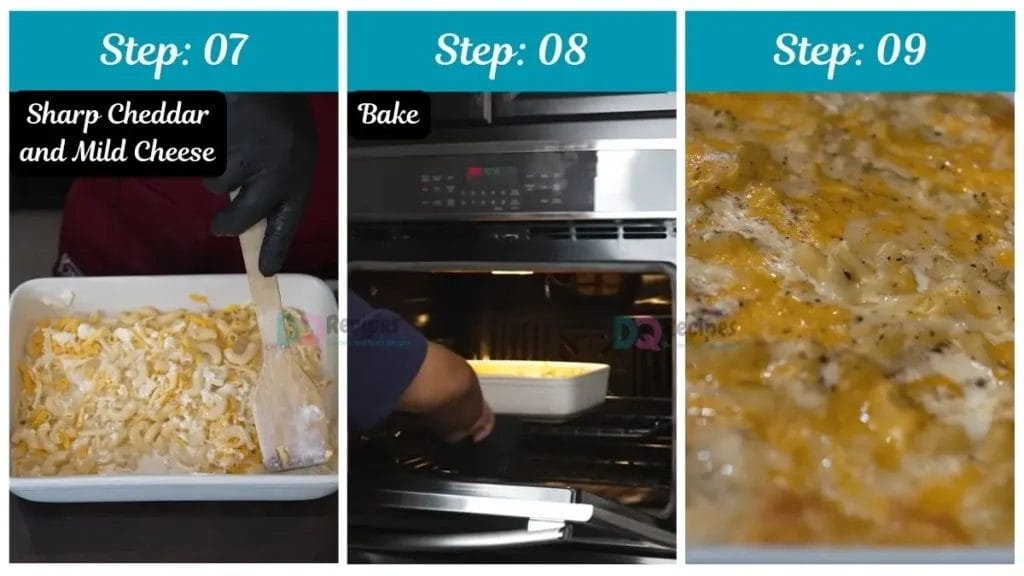
Step 10: Final Cheese and Crisp-Up
Remove from oven and sprinkle the remaining shredded cheese all over the top. Return to oven for another 12–18 minutes until the top is golden brown and the edges are beautifully crispy. Watch closely during the last 5 minutes.
Step 11: Rest and Serve
Remove from oven and let rest 10–15 minutes. This allows the mac and cheese to set up properly and makes it easier to cut into portions. If excess oil pools on top, lightly blot with a paper towel. Serve hot and enjoy those coveted crispy corner pieces!
7 Customization and Pairing Ideas for Serving
1. Protein Power-Up: Transform this pepper belly mac and cheese into a complete meal by adding proteins. Fold in crispy bacon pieces, or diced ham before the final bake. Blackened chicken or spicy andouille sausage complement the Creole seasoning beautifully. For a seafood twist, add cooked shrimp or lump crab meat in the last 10 minutes of baking-perfect for a Louisiana-style feast.
2. Vegetable Variations: Boost nutrition and add color by incorporating vegetables into your mac and cheese recipe. Roasted broccoli florets, sautéed mushrooms, or caramelized onions work wonderfully. For a Southern soul food approach, stir in some cooked collard greens or black-eyed peas. Roasted red peppers add sweetness that balances the pepper heat perfectly.
3. Heat Level Adjustments: Customize the spice level to your preference. For milder mac and cheese, reduce the Creole seasoning to 1 tsp and use less black pepper. To amp up the heat, add diced jalapeños, a splash of hot sauce, or a pinch of cayenne pepper to the cheese sauce. Some people love adding a drizzle of hot honey on top for sweet-spicy contrast.
4. Cheese Combinations: While sharp cheddar is traditional, experiment with different cheese blends. Try smoked gouda for depth, gruyère for nuttiness, or pepper jack for extra kick. A combination of sharp white cheddar, mild yellow cheddar, and a touch of parmesan creates incredible flavor complexity. Avoid pre-shredded cheese when possible-block cheese melts more smoothly.
5. Crunchy Toppings: Add textural contrast with crunchy toppings applied during the last 10 minutes of baking. Panko breadcrumbs mixed with melted butter and parmesan create a golden crust. Crushed Ritz crackers, French fried onions, or even crushed potato chips add restaurant-quality crunch. These toppings make your copycat pepper belly pete mac and cheese recipe even more irresistible.
6. Perfect Pairings: This rich, creamy mac and cheese pairs beautifully with lighter, acidic sides. Serve alongside tangy coleslaw, fresh green salad with vinaigrette, or pickled vegetables to cut through the richness. For a classic BBQ spread, pair with smoked ribs, or grilled chicken. Cornbread and collard greens make it a complete Southern comfort meal.
7. Portion Presentations: Serve this pepper belly mac and cheese as a main dish for casual dinners, or present it as a premium side dish for holiday gatherings like Thanksgiving or Christmas. For parties, cut into squares and serve as handheld portions. It also works beautifully as a potluck contribution-just transport in the baking dish and reheat at your destination. The crispy edges and corners are always the first to go!

7 Essential Tips for Perfect Mac and Cheese
1. Room Temperature Cream Cheese is Critical: The single most important tip for a smooth, lump-free sauce is using room-temperature cream cheese. Cold cream cheese will create stubborn lumps that are difficult to whisk out, resulting in an uneven texture. Take your cream cheese out of the refrigerator at least 1-2 hours before making this recipe, or microwave it in 10-second intervals to soften (but don’t melt it). Soft cream cheese blends seamlessly with the evaporated milk, creating that signature silky base that makes this pepper belly pete mac and cheese recipe so special.
2. Cook Pasta to Perfect Al Dente: Since your macaroni will continue cooking in the oven, it’s crucial to cook it just to al dente-slightly firm to the bite. Overcooked pasta will become mushy after baking. Most elbow macaroni packages recommend 9-10 minutes; aim for the lower end. Immediately rinse with cold water after draining to stop the cooking process. This also removes excess starch that could make your mac and cheese gummy rather than creamy.
3. Use Freshly Shredded Cheese: Pre-shredded cheese contains anti-caking agents (usually cellulose) that prevent smooth melting and can create a grainy texture in your cheese sauce. Block cheese melts far more smoothly and creates that luxurious, creamy consistency. Take the extra few minutes to shred your own cheese-your taste buds will thank you. Use the smaller holes on your grater for faster, more even melting throughout the sauce.
4. Layer Like You Mean It: The layering technique isn’t just for show-it ensures even distribution of sauce and cheese throughout the dish. Starting with sauce on the bottom prevents sticking, while alternating pasta, sauce, cheese, and pepper creates pockets of flavor in every bite. Don’t skip the mid-layer cheese and pepper; they create those delicious surprise moments when you hit a particularly cheesy, peppery section. This is what separates good mac and cheese from unforgettable mac and cheese.
5. Don’t Skip the Butter Greasing: While cooking spray is convenient, rubbing butter generously around your baking dish serves multiple purposes. It prevents sticking, adds rich flavor to the crispy edges, and creates those golden, caramelized corners that everyone fights over. Use cold butter straight from the fridge and really coat every surface. This old-school technique is part of what makes this copycat recipe taste authentic and creates that irresistible buttery crust.
6. Watch the Final Bake Closely: The difference between perfectly golden brown and burnt happens quickly in the final 12-18 minutes. Stay near your oven during this stage and check every few minutes. You’re looking for a deep golden color on top with crispy, slightly darker edges-not black or burnt spots. Oven temperatures vary, so your timing might differ slightly. If the top is browning too quickly but the center isn’t hot enough, tent loosely with foil for a few minutes, then remove to finish crisping.
7. Patience During Resting is Key: As tempting as it is to dig in immediately, letting your mac and cheese rest for 10-15 minutes is essential. During this time, the sauce thickens and sets up, making it much easier to cut clean portions rather than serving a soupy mess. The eggs in the sauce need this time to fully set. The dish will still be piping hot after resting, and the improved texture is worth the wait. Use this time to prepare your other dishes or set the table-your patience will be rewarded with perfect, photo-worthy servings.
Storage and Reheating Guidance
Store leftover pepper belly mac and cheese in an airtight container in the refrigerator for up to 4 days. Reheat individual portions in the microwave for 1-2 minutes, or reheat larger portions covered with foil in a 350°F oven for 15-20 minutes until warmed through. Add a splash of milk before reheating to restore creaminess.
Pepper Belly Pete Mac and Cheese Recipe

If you’ve been searching for the perfect pepper belly pete mac and cheese recipe, this version brings everything together in the most satisfying way. Loaded with the bold flavors people love from the original pepper belly pete mac and cheese, this copycat pepper belly pete mac and cheese recipe keeps all the creamy richness and peppery heat that make it unforgettable. From the first bite, the blend of cheeses, spices, and smooth sauce sets the stage for a comfort dish that stands out from the rest.
- 1 lb 454g elbow macaroni or small pasta of choice
- 2 generous pinches of kosher salt for pasta water
- 2 blocks (8 oz each cream cheese, room temperature (total 16 oz / 452g))
- 1 can (12 oz / 354ml evaporated milk)
- 2 cups 480ml whole milk
- 2 large eggs (lightly beaten)
- 4 cups shredded cheese (divided (sharp cheddar and mild cheese blend recommended))
- 1½ tsp kosher salt (or to taste)
- 1 tsp dry mustard powder
- ½ tsp ground nutmeg (optional)
- 2 –3 tsp Creole or Cajun seasoning (Tony’s, Slap Ya Mama, or Creole Kick)
- Fresh cracked black pepper (generous amounts)
- 2 –3 Tbsp butter for greasing
Step 1: Preheat and Prepare
- Preheat your oven to 350°F (175°C). Start this about halfway through your prep work so it’s ready when you assemble the dish.
Step 2: Boil the Pasta
- Bring a large pot of heavily salted water to a rolling boil. Add 1 lb elbow macaroni and cook to al dente according to package directions (typically 9–10 minutes). Drain immediately and rinse with cold water to stop the cooking process. Set aside.
Step 3: Make the Creamy Base
- In a large mixing bowl, add both blocks of room-temperature cream cheese. Pour in the 12 oz can of evaporated milk. Whisk vigorously or use a hand mixer until mostly smooth with no large lumps remaining. Add 2 cups of whole milk and whisk again until fully combined and silky.
Step 4: Season the Sauce
- Add kosher salt, dry mustard powder, nutmeg (if using), and 2–3 tsp of Creole seasoning to the cream mixture. Taste the mixture at this point (before adding the egg) and adjust seasoning as needed. Add several generous grinds of fresh black pepper.
Step 5: Incorporate the Eggs
- Lightly beat the 2 eggs in a small bowl, then whisk them into the cream mixture until fully incorporated. This adds richness and helps the sauce set properly during baking.
Step 6: Add Cheese to the Sauce
- Stir in half of the shredded cheese (2 cups) until mostly melted into the sauce, creating a thick, cheesy base.
Step 7: Grease the Pan
- Take your 13×9-inch baking dish and generously rub the bottom and sides with butter. This old-school technique creates flavor and prevents sticking.
Step 8: Layer the Mac and Cheese
This layering technique is key to the perfect pepper belly pete mac and cheese:
- Pour a thin layer of cream sauce in the bottom of the dish
- Sprinkle a handful of shredded cheese over it
- Add half the cooked, drained pasta
- Grind fresh black pepper over the pasta layer
- Pour half of the remaining cream sauce over the pasta
- Add the rest of the pasta
- Pour the remaining sauce over the top, gently pushing pasta down so it’s mostly covered
- Sprinkle a light layer of shredded cheese on top (reserve some for the final topping)
- Add a few more cracks of black pepper
Step 9: First Bake
- Bake uncovered at 350°F for 30 minutes. The mac and cheese will be bubbly and starting to brown around the edges.
Step 10: Final Cheese and Crisp-Up
- Remove from oven and sprinkle the remaining shredded cheese all over the top. Return to oven for another 12–18 minutes until the top is golden brown and the edges are beautifully crispy. Watch closely during the last 5 minutes.
Step 11: Rest and Serve
- Remove from oven and let rest 10–15 minutes. This allows the mac and cheese to set up properly and makes it easier to cut into portions. If excess oil pools on top, lightly blot with a paper towel. Serve hot and enjoy those coveted crispy corner pieces!
Store leftover pepper belly mac and cheese in an airtight container in the refrigerator for up to 4 days. Reheat individual portions in the microwave for 1-2 minutes, or reheat larger portions covered with foil in a 350°F oven for 15-20 minutes until warmed through. Add a splash of milk before reheating to restore creaminess.
Common Queries and FAQs
Q: Can I make pepper belly pete mac and cheese ahead of time?
A: Yes! Assemble the entire dish up through step 8, cover tightly with foil, and refrigerate for up to 24 hours. When ready to bake, let it sit at room temperature for 30 minutes, then bake as directed, adding 5-10 extra minutes to the initial baking time since it’s starting cold.
Q: Can I freeze this mac and cheese recipe?
A: Absolutely. Freeze the assembled, unbaked mac and cheese tightly wrapped for up to 2 months. Thaw completely in the refrigerator overnight before baking. You can also freeze leftovers in individual portions for quick future meals. The texture may be slightly different but still delicious.
Q: What type of pasta works best for this recipe?
A: Traditional elbow macaroni is ideal because its curved shape holds the creamy cheese sauce perfectly. However, other small pasta shapes like cavatappi, shells, or penne also work well. Avoid long pasta like spaghetti or very large shapes that won’t distribute the sauce evenly.
Q: Why use evaporated milk in mac and cheese?
A: Evaporated milk has less water content than regular milk, making it thicker and creamier. It creates a richer, more stable cheese sauce that doesn’t separate or become watery during baking. This is a secret ingredient that makes homemade mac and cheese taste professionally made.
Q: Can I make this mac and cheese without eggs?
A: While the eggs help the sauce set beautifully and add richness, you can omit them if needed. The mac and cheese will be slightly looser and more saucy but still delicious. You might want to add an extra tablespoon of flour to the cream cheese mixture to help it thicken.
Q: How do I prevent my mac and cheese from being dry?
A: Make sure you’re using enough sauce-the pasta should be swimming in it before baking. Don’t overbake, and ensure you’re covering the pasta completely with sauce during assembly. If it looks dry before the final cheese topping, add a splash of milk. The resting period also helps redistribute moisture throughout the dish.
Q: What’s the best Creole seasoning for this recipe?
A: Popular brands like Tony Chachere’s, Slap Ya Mama, or Zatarain’s all work wonderfully. Each has a slightly different spice level and flavor profile, so start with 2 tsp and adjust to your preference. You can also make your own blend with paprika, garlic powder, onion powder, cayenne, oregano, and thyme.
Q: Why is my cheese sauce grainy?
A: Graininess usually comes from pre-shredded cheese with anti-caking agents or cheese that’s been overheated. Use freshly shredded block cheese and make sure your cream cheese base is smooth before adding the shredded cheese. Mix gently and avoid high heat when incorporating cheese into the sauce.
This pepper belly pete mac and cheese recipe delivers everything you crave in the ultimate comfort food-creamy, cheesy perfection with a bold peppery kick that sets it apart from ordinary mac and cheese. The combination of cream cheese, evaporated milk, and carefully layered shredded cheese creates an incredibly rich sauce, while the Creole seasoning and fresh black pepper add that signature flavor profile.
Whether you’re making this copycat pepper belly mac and cheese for a family dinner, holiday gathering, or potluck, it’s guaranteed to disappear quickly. Now that you know how to make mac and cheese that rivals any restaurant version, it’s time to get cooking and enjoy those crispy, golden corners!
We’d love to hear how this recipe turns out for you! Give it a try, then drop a comment below to share your thoughts and tips with us.
You can also follow us on Pinterest, and YouTube for more delicious updates and kitchen inspiration. Your feedback and support mean the world to us!